
SettingsSettings for this calculationUS
The standard allowance most suppliers and estimating guides assume for ordinary work.
The height of the clad area on this elevation.
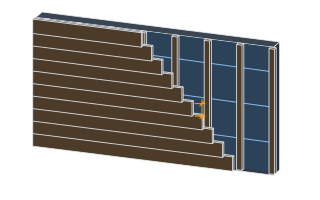
Measure from the bottom of the starter course to the top of the last full course. Gable triangles are better run as a separate calculation using their mean height, since the course count is the same across the triangle but the stud lines each course crosses are not.
The horizontal run of the elevation being clad.
Corner to corner. Do not deduct openings: a course interrupted by a window still lands on the same stud lines either side of it, and the offcuts rarely start the next run cleanly enough to recover the fasteners.
The face of each board left showing once the lap above is set.
Exposure, not board width — the two differ by the minimum headlap the product requires, and using board width here would undercount the courses. Where the elevation has been set out to land a course line on a window head, use the adjusted exposure that setting-out produced.
Centre spacing of the studs or girts behind the cladding.
This is what the fasteners land in, so it is the framing spacing rather than the sheathing layout. Over a rain-screen cavity it is the batten spacing that matters, and where battens run counter to the studs the two spacings are different numbers.
How the boards are fixed at each stud line.
Blind nailing hides the fastener under the course above and is the usual default. Face nailing is called for on wide boards, over some substrates and in higher wind pressures, and some evaluation reports require both together. The report for your product decides this, not preference.
Additional fixings per course called for in a high-wind zone or at corners.
Some schedules tighten the spacing within a corner zone rather than changing the pattern across the whole elevation. Averaging that tightening over the elevation as a per-course figure is close enough for ordering, though it is not a substitute for setting the corner zone out properly on the wall.
The count in one box of the fastener you are actually buying.
Read it off the carton rather than assuming, since the same nail is sold in several box sizes and collated coil counts differ again from loose. Where a gun uses collated strips or coils, count the fasteners rather than the strips.
Extra for dropped, bent and misfired fixings.
Gun work off a scaffold loses more than hand nailing does, and cold weather loses more again. Ten in the hundred is a reasonable working figure for a straightforward elevation; complex work with many cuts and corners runs higher.
Fasteners for this elevation
546 fasteners
- Courses on this elevation
- 16 courses
- Stud lines the elevation crosses
- 31 studs
- Fastening points per course
- 31 fasteners
- Count before the waste allowance
- 496 fasteners
- Boxes to order
- 1 box
They open the calculator with your figures already in it
Lap Siding Fastener Schedule Calculator: 546 fasteners — shown in imperial, US market. The link sets both, so the result they see is the one on your screen.
Show calculation logicHide calculation logic
How this was calculated
Formula source(s)
- Courses = wall height ÷ exposure, rounded up. Fastening points per course = the stud lines the elevation crosses, plus one for the far end, times the fasteners each pattern drives at a stud, plus any high-wind extras you enter.
- The manufacturer's evaluation report is the fastening schedule of record for fibre cement and engineered lap cladding — fastener type, length, penetration and pattern are product-specific and none of them is assumed here.
- ASCE/SEI 7, Minimum Design Loads and Associated Criteria for Buildings and Other Structures — the source of the component and cladding pressure that decides whether a high-wind pattern applies to this elevation
Inputs used
- Elevation Height
- 9 ft
- Elevation Length
- 39 ft
- Course Exposure
- 7 in
- Stud or Girt Spacing
- 16 in
- Nailing Pattern
- Blind nailed — one fastener per stud through the top edge
- Extra Fasteners per Course
- 0
- Fasteners per Box
- 800
- Waste Allowance (%)
- 10
Intermediate steps
- Courses on this elevation
- 16 courses
- Stud lines the elevation crosses
- 31 studs
- Fastening points per course
- 31 fasteners
- Count before the waste allowance
- 496 fasteners
- Boxes to order
- 1 box
What this calculation does not cover
- Trim, corner boards, starter strip and any flashing fixings are separate counts and are not included.
- Corner and edge zones under high wind may need a tighter spacing than an elevation-wide average represents.
Estimated cost — your price
This site holds no price list for this material — local prices vary too much to publish honestly. Enter your supplier's price and the result is costed with it.
Part of bigger jobs
This trade is one line of a job takeoff. Run the whole job and every other trade comes back with it, off the same measurements.
Or plan the space itself: measure it once, doors and windows included, and this figure comes back worked out on that space, with what goes with it.
Computed in your browser — nothing you enter is uploaded. Presented in US customary units and US trade terminology. Where a formula follows a published standard, that standard and its edition are cited beside it on this page; where none governs, the page says so. Local amendments override model codes — verify against the code in force where you build.
Sources checked 2026-09-06 · in the site-wide review of 2026-09-06 · v1.0.1
Regulatory standards & verification citations3
- Courses = wall height ÷ exposure, rounded up. Fastening points per course = the stud lines the elevation crosses, plus one for the far end, times the fasteners each pattern drives at a stud, plus any high-wind extras you enter.
- The manufacturer's evaluation report is the fastening schedule of record for fibre cement and engineered lap cladding — fastener type, length, penetration and pattern are product-specific and none of them is assumed here.
- ASCE/SEI 7, Minimum Design Loads and Associated Criteria for Buildings and Other Structures — the source of the component and cladding pressure that decides whether a high-wind pattern applies to this elevation
Cite this page
Your workspace
Most jobs need more than one number. Add the calculators you need next and they open right here, underneath this one — your figures stay on screen and nothing is lost to a page change.
Tools and safety for this job
To hang siding or cladding. Generic types, no brands, no prices.
Protection this work requires
- Hardwood dust is a recognised carcinogen: extract at the tool and wear a P2/N95 respirator when cutting or sanding indoors.
- Saws, grinders and breakers run above 85 dB, where hearing damage accumulates and does not recover: defenders or plugs for every cut, not just the long ones.
- Most fatal falls on small jobs are from under three metres: use a tower or a ladder tied at the top, and never work off the top two rungs.
Show the 7 tools this job needsHide tools
Essential
Chalk line
Circular saw
Cordless drill/driver
Spirit level
Tape measure
Tower scaffold or trestles
Recommended
Mitre saw
Also needed as materials: chalk refill, circular saw blades, drill and driver bits, mitre saw blades.
what each cladding tool is for, and the spec that decides which to buy where one does.