
SettingsSettings for this calculationUS
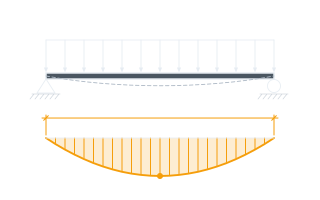
The uniformly distributed lateral (wind) load along the stud's height.
This field is metric and stays exactly as typed. The stud height above it follows the visitor's unit system and so does E (psi on a US page); this load does not, because the site has no force-per-length dimension to hand it. US practice quotes a stud line load in plf — lbf per linear foot — and 1 plf = 14.594 N/m. Both halves of that convert: the lbf becomes 4.4482 N and the linear foot becomes 0.3048 m, so the factor is 4.4482/0.3048, not the 3.281 the denominator on its own would suggest. Multiply a plf figure by 14.594 before entering it. Nothing here stops you if you do not — this field takes 20 to 5000 N/m, which is 1.37 to 342.6 plf, so a real line load in plf lands inside the range and is used at face value with no warning. The default 300 N/m is 20.6 plf, and entering 20.6 returns 0.054 mm of deflection where the stud actually moves 0.791 mm, 6.9% of it, because deflection is directly proportional to this load. A plf figure below 20 is instead rewritten up to the 20 minimum, and the notice that appears names the bound, not the unit. Both outcomes report less movement than the stud has, which is the direction that turns a fail into a pass.
The stud's clear span between top and bottom track (or bracing).
Track to track. Bridging does NOT shorten this span for a wind check: bridging restrains the stud against twisting and against buckling about its weak axis, while wind bends it about its strong axis over the full storey height. Counting bridging rows as supports is a common mistake and an optimistic one — it can halve a calculated deflection that the wall will still have.
The steel's modulus of elasticity — 200,000 MPa (29,000,000 psi) is standard for structural steel.
One of the few figures on this site that genuinely does not need looking up, and it does not change with grade: a higher-strength steel is STRONGER, not stiffer. That has a direct practical consequence — specifying a better grade to cure a deflection problem achieves nothing at all. Deflection is fixed with a deeper section, a closer spacing or a shorter span, and by nothing else.
The stud's AISI S100 effective moment of inertia, from the manufacturer's span table for its size and gauge.
SSMA and ClarkDietrich publish this in in⁴ and this field wants ×10⁶ mm⁴, so multiply by 0.4162: a 0.191 in⁴ section is 0.0795 here. The range is wide — a 1-5/8 in 33 mil stud is near 0.025 and a 6 in 43 mil stud is over 0.7 — which is exactly why the figure has to come off the table for your size and gauge rather than being estimated. Use the effective value the table gives for deflection, not the gross Ix: local buckling reduces the section that is actually working, and the two columns are not the same number.
The applicable code deflection limit, as a fraction of the span.
For a stud wall the limit belongs to the CLADDING, not to the steel. A brittle finish is given a tighter limit than a flexible one, because the finish cracks while the stud is still comfortable — the wall is being checked on the finish's behalf. Where the inside and outside finishes differ in brittleness, the tighter of the two governs the wall.
Calculated stud deflection
0.0332 in
The deflection this stud works out to is below the L/240 limit for the span entered shown with it — you entered it from the deflection ratio you chose. I_eff has to be the manufacturer's or AISI S100 figure for this exact stud size and gauge; an assumed one moves this answer in proportion. Being under one limit is not a design. Nothing else is checked here — not the other limit states, not the connections, not the member the load arrives from.
- Allowable limit
- 0.5 in
They open the calculator with your figures already in it
Cold-Formed Steel (CFS) C-Stud Deflection Checker: 0.0332 in — shown in imperial, US market. The link sets both, so the result they see is the one on your screen.
Show calculation logicHide calculation logic
How this was calculated
Formula source(s)
- AISI S100 governs how a CFS stud's effective section properties (I_eff) are derived, but the deflection check itself is standard elastic beam theory: Δ = 5wL⁴/(384EI_eff); manufacturers (SSMA, ClarkDietrich) publish I_eff per stud size/gauge in their span tables for use in this formula
Inputs used
- Uniform Lateral (Wind) Load (N/m)
- 300
- Stud Height (Span)
- 10 ft
- Modulus of Elasticity E
- 29007547.55 psi
- Effective Moment of Inertia I_eff (×10⁶ mm⁴)
- 2
- Deflection Limit
- L/240
Intermediate steps
- Allowable limit
- 0.5 in
Confidence note: The deflection this stud works out to is below the L/240 limit for the span entered shown with it — you entered it from the deflection ratio you chose. I_eff has to be the manufacturer's or AISI S100 figure for this exact stud size and gauge; an assumed one moves this answer in proportion. Being under one limit is not a design. Nothing else is checked here — not the other limit states, not the connections, not the member the load arrives from.
What this calculation does not cover
- The load field takes a line load already resolved onto one stud, not a wind pressure. Working that out is the reader's own step: the design pressure multiplied by the width of wall that stud picks up, which is the stud spacing for a typical stud but roughly half the opening width plus half a spacing for a jamb stud beside a door or window. Type a pressure straight into the field and the answer is wrong by exactly that tributary width.
- The formula is the simply supported single span, pinned at both tracks, with the whole stud height taken as the span. Deflection goes as the fourth power of that span, so a height 10 per cent out shifts the answer by about 46 per cent, and a stud braced at mid-height by a bridging row is a different case: the span to enter is the distance between braces, not the storey height.
- This is a serviceability check and nothing else. Bending capacity, web crippling where the stud bears on the track, and the combined axial-plus-bending case for a load-bearing stud are separate AISI S100 checks that a passing deflection result says nothing about. The elastic formula also assumes the flanges are held against twisting by sheathing or bridging, because a C-section's shear centre lies outside the web; an unrestrained stud rotates as it bends and moves more than this arithmetic reports.
- The three limit ratios are a menu, and the page does not know which one your specification or finish manufacturer requires. It also leaves the load exactly as typed: many codes check deflection under a serviceability wind that is a fraction of the ultimate design wind, and that fraction is jurisdictional, so putting an ultimate-level line load against an L/360 limit compares two different load cases.
- The result is the stud's own mid-height bending and nothing more. It excludes the movement at the head of wall that a deflection track exists to absorb, the deflection of the floor or roof structure above, and any slip in an undersized nested track leg. The finish sees the sum of all of those, which is what a tight L/600 brittle-finish limit is really trying to protect.
Add the equipment this sizes
This result is a specification — 0.0332 in — not a quantity. Put the thing it sizes into your project: how many, what you call it, and your supplier’s price.
Computed in your browser — nothing you enter is uploaded. Presented in US customary units and US trade terminology. Where a formula follows a published standard, that standard and its edition are cited beside it on this page; where none governs, the page says so. Local amendments override model codes — verify against the code in force where you build.
Sources checked 2026-09-05 · in the site-wide review of 2026-09-06 · v1.0.1
Regulatory standards & verification citations1
- AISI S100 governs how a CFS stud's effective section properties (I_eff) are derived, but the deflection check itself is standard elastic beam theory: Δ = 5wL⁴/(384EI_eff); manufacturers (SSMA, ClarkDietrich) publish I_eff per stud size/gauge in their span tables for use in this formula
Cite this page
Your workspace
Most jobs need more than one number. Add the calculators you need next and they open right here, underneath this one — your figures stay on screen and nothing is lost to a page change.