
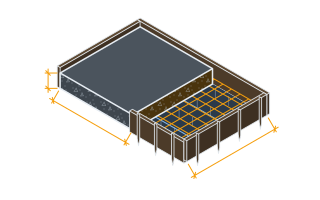
SettingsSettings for this calculationUS
The longer plan dimension of the reinforcing mat.
Support lines are set out along this direction at the rated spacing, so it drives how many lines the mat needs. Where a slab is poured in bays, take one bay at a time — a construction joint interrupts the mat and the supports with it.
The plan dimension across the direction the support lines run.
This decides how many bars each support line has to carry. Individual chairs sit at the intersections; a continuous bolster spans the whole width in one piece, which is why the page reports both counts.
Centre-to-centre spacing of the bars being supported.
Closer bars mean more of them to hold up, but they also stiffen the mat, which is part of why a supplier's rated support spacing varies with the grid. Enter the spacing of the layer that actually rests on the supports.
How far apart the supports may sit along a bar, from your supplier's data or your specification.
This is the number that decides whether cover survives the pour. A mat that will be walked on, or that carries a heavy top layer, needs closer supports than one that will not — and a spacing chosen for a static check is the wrong spacing for a crew dragging a hose across it.
Whether each bar sits on a support or the mat spans between supported bars.
A stiff mat with closely spaced bars can span between supported lines, which cuts the chair count substantially. A light mat cannot, and the unsupported bars sag between the ones that are held — visible in the finished soffit as a wavy cover line.
Enter one for a single layer, two where a top and a bottom mat each need supporting.
A two-way slab with top and bottom steel needs both carried. The top mat rides on taller supports standing off the bottom mat or off the deck, and those are a different product from the bottom bolsters even though the count works out the same way.
The length of vertical form face where cover has to be held off the steel.
Walls, beam sides and slab edges all need the cage held back from the form, and gravity does nothing to help there. Enter zero if the job has no vertical faces requiring spacers.
Centre-to-centre spacing of the spacers along that vertical face.
Closer than the mat supports, usually, because a cage pushed by a vibrator moves easily and a spacer only works where it is. Follow the spacing your specification names, or the supplier's recommendation for the cage weight.
Bar supports needed
140 chairs
A count on the grid you entered. It does not judge whether the support spacing is adequate — that depends on bar size, mat stiffness and the traffic the mat will take, and it belongs to your supplier's data or your specification.
- Support lines along the mat
- 10 lines
- Bars across the mat at this spacing
- 27 bars
- Bars actually carried on each line
- 14 bars
- Chairs per mat
- 140 chairs
- Continuous bolster instead of point chairs
- 260 ft
- Side-form spacers
- 33 spacers
- Mat area supported
- 1,014 ft²
- Supports per unit of mat area
- 0.14 chairs/ft²
They open the calculator with your figures already in it
Rebar Chair and Bolster Count Calculator: 140 chairs — shown in imperial, US market. The link sets both, so the result they see is the one on your screen.
Show calculation logicHide calculation logic
How this was calculated
Formula source(s)
- CRSI Manual of Standard Practice — bar support types and classes, the practice of carrying a mat on a grid of individual chairs or on continuous bolsters, and the use of side-form spacers to hold cover on vertical faces
- The support spacing is an input rather than a built-in table because the figure that governs depends on bar size, mat stiffness and whether the mat is walked on. Take it from your bar-support supplier's data or from the spacing your specification names
- Chair count = (support lines along the mat) x (supported bars across it), which is arithmetic on the grid you enter rather than a published quantity
Inputs used
- Mat Length
- 39 ft
- Mat Width
- 26 ft
- Bar Spacing in the Mat
- 11.75 in
- Rated Support Spacing Along the Bar
- 4 ft
- Support Frequency Across the Mat
- Every second bar supported
- Number of Mats to Support
- 1
- Side-Form Run Needing Spacers
- 130 ft
- Side-Form Spacer Spacing
- 4 ft
Intermediate steps
- Support lines along the mat
- 10 lines
- Bars across the mat at this spacing
- 27 bars
- Bars actually carried on each line
- 14 bars
- Chairs per mat
- 140 chairs
- Continuous bolster instead of point chairs
- 260 ft
- Side-form spacers
- 33 spacers
- Mat area supported
- 1,014 ft²
- Supports per unit of mat area
- 0.14 chairs/ft²
Confidence note: A count on the grid you entered. It does not judge whether the support spacing is adequate — that depends on bar size, mat stiffness and the traffic the mat will take, and it belongs to your supplier's data or your specification.
What this calculation does not cover
- No support-spacing table is applied; the spacing is yours to supply and yours to defend.
- Chair HEIGHT is not calculated. It follows from the specified cover, the bar diameters and the layer order.
- Sand plates or larger bearing feet may be required on soft subgrade or on a vapour barrier; the count is the same, the product is not.
- Openings, thickenings and bays that break the mat need counting separately.
Estimated cost — your price
This site holds no price list for this material — local prices vary too much to publish honestly. Enter your supplier's price and the result is costed with it.
Computed in your browser — nothing you enter is uploaded. Presented in US customary units and US trade terminology. Where a formula follows a published standard, that standard and its edition are cited beside it on this page; where none governs, the page says so. Local amendments override model codes — verify against the code in force where you build.
Sources checked 2026-09-02 · in the site-wide review of 2026-09-06 · v1.0.1
Regulatory standards & verification citations3
- CRSI Manual of Standard Practice — bar support types and classes, the practice of carrying a mat on a grid of individual chairs or on continuous bolsters, and the use of side-form spacers to hold cover on vertical faces
- The support spacing is an input rather than a built-in table because the figure that governs depends on bar size, mat stiffness and whether the mat is walked on. Take it from your bar-support supplier's data or from the spacing your specification names
- Chair count = (support lines along the mat) x (supported bars across it), which is arithmetic on the grid you enter rather than a published quantity
Cite this page
Your workspace
Most jobs need more than one number. Add the calculators you need next and they open right here, underneath this one — your figures stay on screen and nothing is lost to a page change.
Tools and safety for this job
To fix reinforcement. Generic types, no brands, no prices.
Protection this work requires
- Saws, grinders and breakers run above 85 dB, where hearing damage accumulates and does not recover: defenders or plugs for every cut, not just the long ones.
- Breakers and grinders cause permanent nerve damage: limit continuous trigger time, keep hands warm, and stop if fingers tingle or blanch.
- Boards, blocks and bagged material cause most lasting back injuries on small sites: two people or a lifter for full sheets, and never a bag on one shoulder up a ladder.
- Nailing, chiselling and cutting all throw fragments: glasses to EN 166 or ANSI Z87.1, and goggles rather than glasses overhead.
Show the 4 tools this job needsHide tools
Essential
Tape measure
Recommended
Rebar cutter and bender
Rebar tying tool
Optional
Angle grinder
Also needed as materials: cutting and diamond discs, tie wire.
what each concrete tool is for, and the spec that decides which to buy where one does.
Supporting every second bar leaves the mat spanning between lines — fine on a stiff grid, and the reason a light mat shows a wavy cover line in the finished soffit. At 1.49 supports per square metre (0.14 per square foot), the same grid bought as continuous bolster comes to 79.2 m (260 ft) of runner, which on a large pour is usually the faster fix and often the cheaper one.